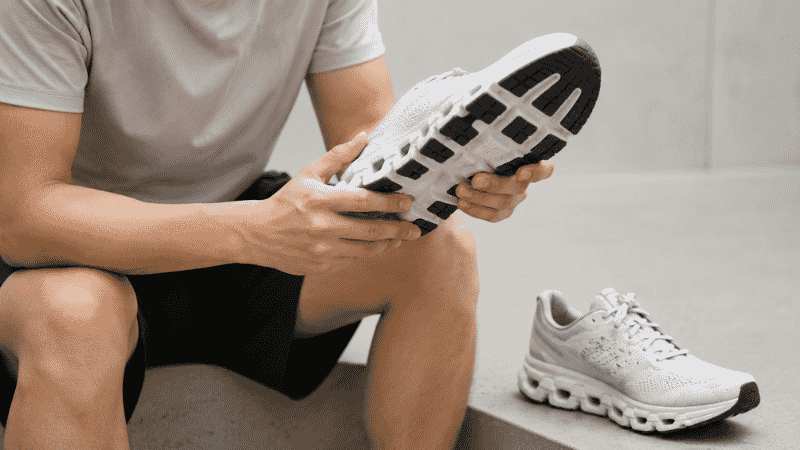
Your shoes look fine. The mesh isn’t torn. The sole isn’t flapping. The color hasn’t faded. You’ve had them for about eight months, and honestly, they look almost the same as the day you bought them.
But something’s different. Your knees started aching after longer runs a few weeks ago. Your shins are sore in the morning after a Tuesday night 5K in a way they weren’t six months ago. You’ve been blaming your training load, your sleep, your age — anything but the shoes, because the shoes look perfectly fine.
This is exactly how worn-out running shoes injure people. Not dramatically, with visible sole separation and obvious damage — but quietly, over weeks, as the midsole foam that was absorbing 2–3 times your body weight with every stride gradually compresses to a fraction of its original thickness. The upper looks new because it’s made of durable fabric that doesn’t compress. The midsole is invisible from the outside, and it’s been done for months.
Knowing when to replace running shoes isn’t really about mileage. It’s about knowing what to look for — and having the honesty to act on it before your body tells you in the form of injury.
Key Takeaways
- The midsole foam — the part that does the actual cushioning work — degrades significantly before any visible signs appear on the upper or outsole. A shoe can look brand new and be functionally exhausted.
- Running shoes typically last 300–500 miles, but body weight, surface, and brand foam technology all affect where your specific shoes fall in that range.
- Research published in the Journal of Biomechanics found that EVA foam midsoles lose meaningful cushioning properties well before the outsole shows visible wear — making appearance a poor indicator of shoe condition.
- Replacing shoes reactively — after injury — is significantly more expensive than replacing them proactively, when you factor in physio visits, rest days, and the recovery timeline.
- The six signs in this guide can be assessed in under five minutes, with no tools.
- Most running injuries attributed to “overtraining” are at least partly caused by degraded footwear. If your training load hasn’t changed but your injury rate has, check the shoes first.
Why Running Shoes Die Invisibly
Before getting to the six signs, it’s worth understanding the mechanism — because once you understand it, you’ll never look at an old pair of running shoes the same way.
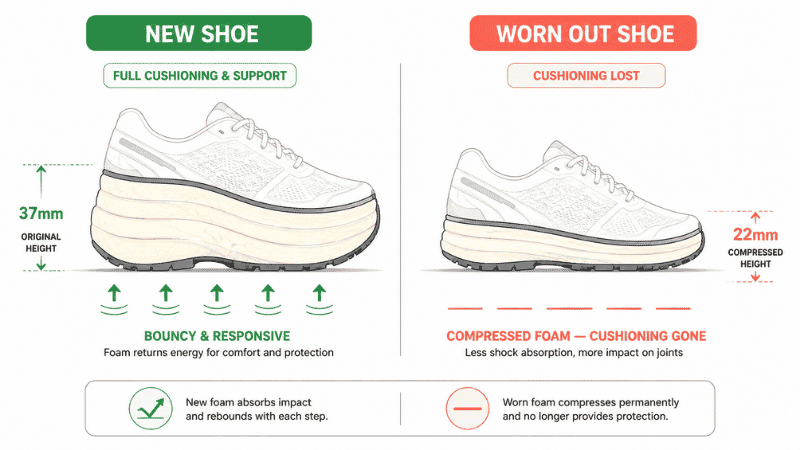
Running shoe midsoles are made of foam — most commonly EVA (ethylene-vinyl acetate) or more advanced compounds like PEBA, TPU, or DNA foam depending on the brand. This foam is engineered to compress under impact and rebound quickly, absorbing the shock of each foot strike before it reaches your joints. That rebound is the cushioning you feel.
The problem is that foam is viscoelastic — it compresses and recovers, but not perfectly and not forever. Each compression cycle leaves the foam very slightly more compressed than before. After hundreds of thousands of compressions, the foam has permanently flattened to a fraction of its original thickness. It still looks like a midsole. It still has color and shape. But it has almost none of its original cushioning function.
The upper — the mesh fabric wrapping your foot — is made of entirely different materials that don’t compress. It will outlast the midsole by a significant margin. This is why shoes that are genuinely finished on the inside can still look almost new on the outside.
The outsole — the rubber on the bottom — wears more visibly, but it wears from friction rather than compression. It can still have rubber left while the midsole underneath has fully compressed. The outsole’s condition tells you something, but it doesn’t tell you everything.
The part that matters most is the part you can’t see without testing. Which is what the six signs are for.
Sign 1: The Thumb Press Test Comes Back Empty
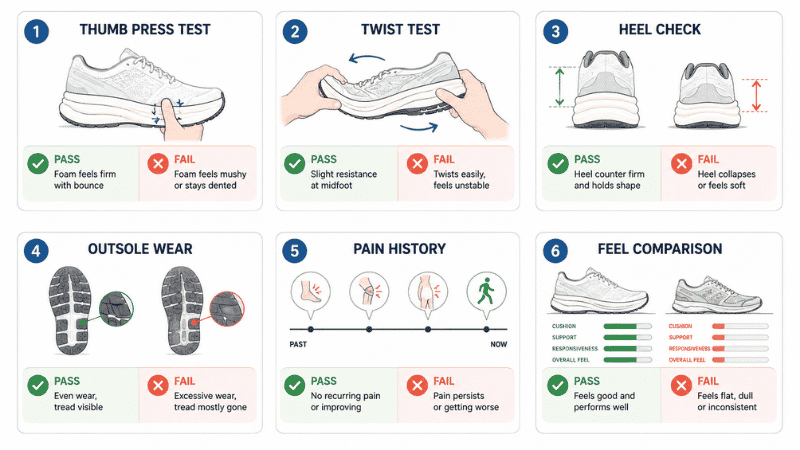
This is the fastest and most reliable single test for midsole condition, and it takes about ten seconds.
Press your thumb firmly into the heel area of the midsole — the foam part of the shoe, not the outsole rubber. Apply meaningful pressure, hold for two seconds, then release.
On a shoe with functional cushioning, you’ll feel the foam compress noticeably under your thumb and then rebound — bouncing back toward its original shape relatively quickly. On a shoe whose foam has compressed past its effective life, you’ll feel very little give. The foam is already at a compressed state and has nowhere further to go. There’s no rebound because there’s no structure left to rebound.
Compare this test between your running shoes and any newer or less-used shoe you have. The difference between functional and exhausted foam is unmistakable once you’ve felt both.
Do this test at the heel and at the forefoot — they may wear differently depending on your gait. Heavy heel strikers will find the heel foam goes first. Forefoot strikers will find the opposite. Both matter.
Sign 2: New Aches Appeared Without a Change in Training
This is the sign most people dismiss for weeks or months before connecting it to their shoes. The pattern: you’ve been running the same routes, the same distances, the same days — and then knee pain, shin soreness, or hip discomfort appears as a new feature of your post-run experience.
It’s easy to blame mileage buildup, a night of poor sleep, or getting older. These are all real factors. But if your training load genuinely hasn’t changed and a new pain pattern has appeared, the most logical variable to check is the shoes.
The mechanism: as midsole foam compresses, your foot lands with more impact reaching the bones and joints than the shoe was designed to transmit. That increased impact force travels through the kinetic chain — foot, ankle, shin, knee, hip — and accumulates. The pain shows up at whichever link in the chain is weakest for you. For some people it’s the knee. For others it’s the shin. For others it’s the plantar fascia.
The old running shoes causing pain pattern is one of the most reliably predictable things in footwear — and one of the most consistently overlooked. Before you schedule physio or blame your training plan, check when you bought your shoes and do the thumb press test.
Sign 3: The Sole Twists Too Easily at the Midfoot
Hold your shoe at the heel with one hand and the toe with the other. Gently twist in opposite directions — like wringing out a cloth, but gently.
A shoe with intact midsole structure will resist this twist. The foam provides a torsional rigidity that keeps the shoe relatively stable through the midfoot. A shoe whose midsole has broken down will twist more easily than it should — the structural integrity is gone along with the cushioning.
This test is particularly useful for identifying midsole breakdown in the midfoot area, which doesn’t always show up clearly in the thumb press test. Some shoes degrade unevenly — the heel may still feel reasonably firm while the arch area has compressed significantly.
The shoe should flex at the ball of the foot (roughly the front third) when you bend it from heel to toe — that flexibility is intentional and correct. But it shouldn’t twist easily through the middle. If it does, the midsole structure has degraded.
Sign 4: Your Heel Sits Lower Than It Used to
This one requires a reference point, which is why it’s more useful for people who’ve had the shoes for a while and are familiar with how they feel.
Stand in your shoes and pay attention to your perceived heel height relative to your forefoot. A fresh running shoe with a standard heel drop (8–12mm) feels slightly elevated at the heel. As the midsole foam compresses — and the heel typically compresses faster than the forefoot, especially for heel strikers — the effective heel drop decreases.
If you’ve been running in the same shoes for several months and they now feel more “flat” than they did when new, the midsole foam at the heel has likely compressed significantly. This changes your effective heel drop, which changes your biomechanics, which changes your injury risk.
The check: look at the heel of your shoe from behind. Does it look visually compressed compared to a new pair? Is there asymmetric compression — one heel lower than the other? Either observation is a signal.
Sign 5: Visible Outsole Wear Patterns That Reveal Hidden Problems
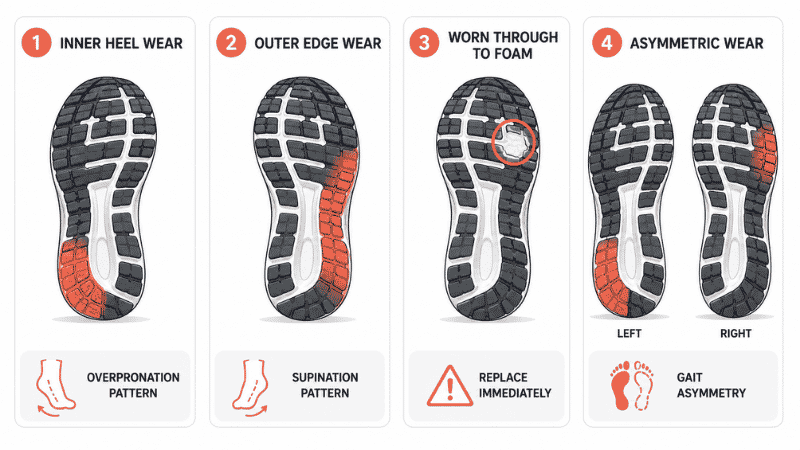
The outsole tells a story, even when the midsole doesn’t show visible damage. Look at the bottom of your shoes and note where the rubber has worn.
Heavy inner heel wear: Significant wear on the medial (inner) heel edge indicates overpronation — your foot is rolling excessively inward. This pattern means the midsole on the inner side has also been under disproportionate load. The medial midsole support (if the shoe has any) has likely compressed faster than the rest.
Outer edge wear: Wear concentrated on the lateral (outer) edge indicates supination. The outer midsole has absorbed more impact than average.
Wear through to the midsole layer: When the rubber outsole has worn completely through to expose the lighter-colored foam underneath, two things are true: the shoe is done on outsole traction, and the midsole underneath has almost certainly exceeded its functional lifespan.
Uneven wear between left and right: If one shoe shows significantly more wear than the other, you have asymmetric gait mechanics. The heavier-worn shoe’s midsole has also degraded faster — and may have failed while the other still has life. You may need to replace both regardless.
Sign 6: The “These Used to Feel Better” Feeling
This one is subjective, but it’s real — and runners who’ve owned multiple pairs of the same shoe report it consistently.
When shoes are new, each run has a baseline of cushioning and support that you adapt to. After months of wear, the foam gradual changes happen slowly enough that you don’t notice them day to day. But there’s a moment — usually after you’ve run in a newer pair, or tried on fresh shoes in a store — where you suddenly have a reference point. And the old shoes feel flat, hard, and unsupportive in comparison to what you remember.
This “these used to feel better” recognition is your body telling you something accurate. The foam has changed. You’ve adapted to progressively less cushioning over time, in the same way that you adapt to progressive training loads. The difference is that training adaptation makes you stronger. Adapting to a degrading midsole just moves the impact somewhere less cushioned.
Trust this feeling. It’s not nostalgia — it’s your proprioception telling you the shoe has changed.
How to Tell If Running Shoes Are Worn Out: The 5-Minute Full Assessment
Combine all six signs into a quick assessment you can do right now:
Step 1 — Thumb press (30 seconds). Press firmly into heel and forefoot midsole of both shoes. Note rebound speed. Compare to newer shoes if available.
Step 2 — Twist test (30 seconds). Hold heel and toe, twist gently. Resistance at midfoot = intact structure. Easy twisting = degraded.
Step 3 — Heel visual check (30 seconds). Look from behind. Compressed, tilted, or asymmetric heels = foam gone on that side.
Step 4 — Outsole inspection (1 minute). Note wear location and severity. Wear through to foam = immediate replacement signal.
Step 5 — Pain history review (1 minute). New aches in knees, shins, or hips without training change = likely midsole fatigue.
Step 6 — Comparison run (if possible). If you have access to a newer pair, run a short distance in each and compare the impact sensation underfoot.
If three or more of these checks return a negative result, replace the shoes before your next training block — not after the next injury.
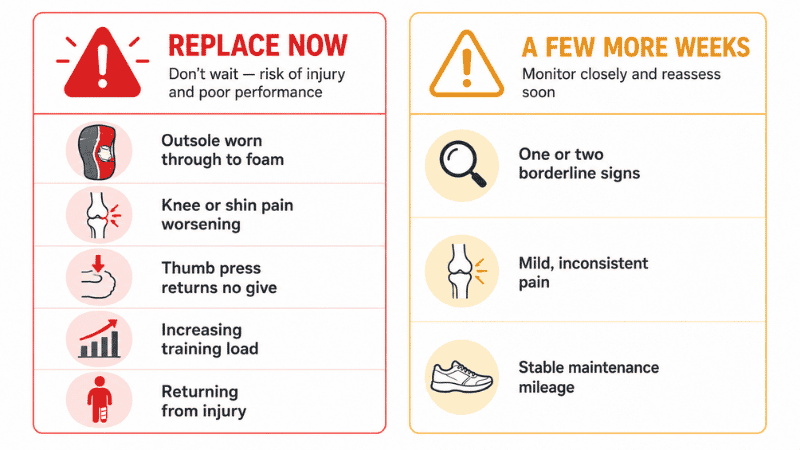
When Replacing Shoes Is Urgent vs. When You Have Time
Replace immediately if:
- Outsole rubber has worn through to the midsole foam in the heel or forefoot
- Knee, shin, or hip pain has appeared and worsened over the last 2–4 weeks
- The thumb press returns almost no give in the heel (foam fully compressed)
- You’re increasing training load for a race or goal event
You have a few weeks if:
- One or two signs are borderline
- Pain is mild and inconsistent
- You’re in a maintenance phase with stable mileage
Don’t wait if you’re returning from injury. Starting a comeback in worn-out shoes is one of the most reliable ways to re-injure yourself. The shoe’s midsole, which was already degraded before you stopped, hasn’t recovered during your rest period. It’s still done.
How Often Should You Replace Running Shoes?
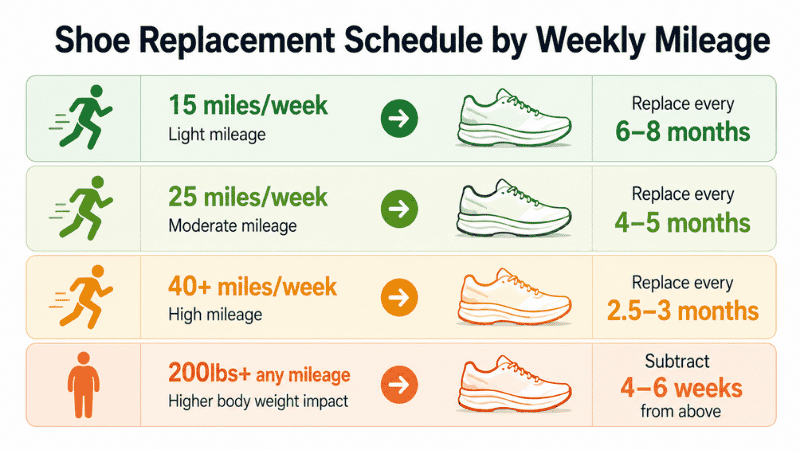
This depends on your weekly mileage and body weight more than anything else. As a practical guide:
- 15 miles/week average weight: Replace every 6–8 months
- 25 miles/week average weight: Replace every 4–5 months
- 40+ miles/week average weight: Replace every 2.5–3 months
- Heavier runners (200lbs+) at any mileage: Subtract 4–6 weeks from the above estimates
For the full breakdown of how weight, surface, foam technology, and rotation habits affect your specific replacement timeline, our running shoe lifespan guide covers the numbers in detail.
The Case for Tracking Your Mileage
The most reliable way to know when to replace running shoes isn’t any physical test — it’s knowing how many miles you’ve put on them. Physical tests catch shoes that are already past their limit. Mileage tracking lets you act before you reach that point.
Most running apps track this automatically. In Garmin Connect, Strava, and Nike Run Club, you can assign shoes to your workouts and the app accumulates mileage per pair. Set an alert at 300 miles. Check the physical signs at that point. Make a decision based on both data points rather than either alone.
If you don’t track mileage, start now with your current shoes. Note the date and your best estimate of current mileage. Even an imperfect number is better than no number.
Frequently Asked Questions
How do I know when to replace my running shoes? Check six things: midsole rebound under thumb pressure, resistance to midfoot twisting, visual heel compression from behind, outsole wear pattern, new pain history, and whether they feel noticeably different from when new. If three or more checks return negative, replace before your next training block.
How often should you replace running shoes? Every 300–500 miles for most runners, which translates to every 4–8 months depending on weekly mileage. Heavier runners and those on concrete surfaces should expect replacement toward the lower end. Use a mileage tracker and combine with physical checks rather than waiting for injury to tell you.
Can worn-out running shoes cause knee pain? Yes — this is one of the most common and most overlooked causes of running-related knee pain. As midsole foam compresses, more impact force reaches the knee joint with each stride. If knee pain appeared without a change in training load, check your shoes before assuming the problem is biomechanical or training-related.
Do running shoes expire if not used? Yes. Foam degrades from UV exposure, humidity, and temperature cycling even without mechanical compression. Shoes stored unworn for 2–3 years have likely lost meaningful cushioning. Before returning to running after a long break, test the foam rebound on your stored shoes before assuming they’re still functional.
Should I replace running shoes if the upper is still fine? The upper’s condition is irrelevant to the shoe’s functional state. The midsole foam — not the upper — provides cushioning and support. A shoe with a perfect upper and compressed midsole is functionally finished. Always assess the midsole, not the appearance.
The Bottom Line
Running shoes don’t announce when they’re done. They just quietly stop doing their job — and your joints pay the difference.
The six signs in this guide — midsole rebound, twist resistance, heel compression, outsole wear, new pain patterns, and the “these used to feel better” feeling — give you a concrete assessment framework that takes five minutes and costs nothing. Use them regularly, especially at the 300-mile mark, and you’ll almost never be caught running in dead shoes again.
If you’re currently dealing with knee pain that appeared around the same time as other midsole warning signs, our knee pain after running guide explains the mechanism in detail. And if you want to build a tracking system that tells you when to replace shoes before the physical signs appear, our running shoe lifespan guide covers mileage tracking and brand-specific durability benchmarks.
References
- Verdejo, R., & Mills, N.J. “Heel-shoe interactions and the durability of EVA foam running-shoe midsoles.” Journal of Biomechanics, 2004.
- Kong, P.W., & Candelaria, N.G. “Running in new and worn shoes: a comparison of three types of cushioning footwear.” British Journal of Sports Medicine, 2009.
- Cook, S.D., et al. “Shock absorption characteristics of running shoes.” American Journal of Sports Medicine, 1985.
- American Academy of Podiatric Sports Medicine (AAPSM). When to Replace Athletic Shoes. aapsm.org
- Malisoux, L., et al. “Shoe cushioning influences the running injury risk according to body mass.” American Journal of Sports Medicine, 2017.